> ## Documentation Index
> Fetch the complete documentation index at: https://docs.lunarphp.com/llms.txt
> Use this file to discover all available pages before exploring further.
# Products
## Overview
Products are generally what you will be selling in your store. You define all your attributes against the product and
products can also have variations. In Lunar a product will always have at least one variation. From a UX point of view,
it will just look like you're editing a single product, but behind the scenes you'll be editing one variant.
Products also belong to a `ProductType` and aside from the attributes, which you are free to define yourself, will have
a base SKU and a brand name.
## Creating a product
```php theme={null}
Lunar\Models\Product::create([
'product_type_id' => $productTypeId,
'status' => 'published',
'brand_id' => $brandId,
'attribute_data' => [
'name' => new TranslatedText(collect([
'en' => new Text('FooBar'),
])),
'description' => new Text('This is a Foobar product.'),
],
]);
```
## Customer Groups
You can assign customer groups to a product, this allows you to either always have that product enabled for the customer
group, or you can state which dates they should be active for (as long as the customer group is enabled).
### Attaching customer groups
```php theme={null}
// Will schedule for this product to be enabled in 14 days for this customer group.
$product->scheduleCustomerGroup($customerGroup, now()->addDays(14));
// Schedule the product to be enabled straight away
$product->scheduleCustomerGroup($customerGroup);
// The schedule method will accept an array or collection of customer groups.
$product->scheduleCustomerGroup(CustomerGroup::get());
```
### Retrieving products for a customer group
If you want to get all products related to a customer group, you can use the `customerGroup` scope. This scope can
either take a single customer group (or customer group id) or a collection/array of ids/customer group models.
```php theme={null}
// Can be an array of ids
$products = \Lunar\Models\Product::customerGroup(1)->paginate(50);
$products = \Lunar\Models\Product::customerGroup([
$groupA,
$groupB,
])->paginate(50);
```
## Product Types
e.g. Television, T-Shirt, Book, Phone, etc.
Assigns the appropriate attributes for the product type.
### Creating a product type
```php theme={null}
Lunar\Models\ProductType::create([
'name' => 'Boots',
]);
```
Product Types also have [Attributes](/0.x/reference/attributes) associated to them. These associated attributes will
determine what fields are available to products when editing. For example if you had an attribute of `Screen Type`
associated to a `TVs` product type, any products with that product type would have access to that attribute when
editing.
You can associate attributes to a product type like so (it's just a straight
forward [Polymorphic relationship](https://laravel.com/docs/8.x/eloquent-relationships#many-to-many-polymorphic-relations)).
```php theme={null}
$productType->mappedAttributes()->attach([ /* attribute ids ... */ ]);
```
You can associate both `Product` and `ProductVariant` attributes to a product type which will then display on either the
product or product variant when editing.
If you decide to delete an attribute, this will cause the association to be dropped and you could lose data.
### Retrieving the product type relationship
If you have a product, you can fetch its product type like so:
```php theme={null}
$product->productType;
$product->load(['productType']);
```
## Product Identifiers
You can choose to add product identifiers to each product variant. These are fields which, as the name suggests, allow
you to identify a product and its variants for use in your internal systems. You can choose whether these are required
and unique in the hub whilst editing.
### Available fields
**SKU**
SKU stands for “stock keeping unit” and — as the name suggests — it is a number (usually eight alphanumeric digits) that
you can assign to products to keep track of stock levels internally. If a product has different colors and sizes, each
variation may use a unique SKU number.
**GTIN**
A Global Trade Item Number (GTIN) is a unique and internationally recognized identifier for a product. These usually
accompany a barcode and are useful when using services such as Google to help them classify the product.
**MPN**
MPN (Manufacturer Part Number) is the product identifier used to differentiate a product among other (similar) products
from the same brand/manufacturer, making it easier for customers to find and buy your products and protecting them from
counterfeit.
**EAN**
European Article numbering code (EAN) is a series of letters and numbers in a unique order that helps identify specific
products within your own inventory.
### Validation
Depending on your storefront needs, you might not need any of these fields to be required or unique. For this reason you
can change this behaviour at a validation level.
`config/lunar-hub/products.php`
```php theme={null}
'sku' => [
'required' => true,
'unique' => false,
],
'gtin' => [
'required' => false,
'unique' => false,
],
'mpn' => [
'required' => false,
'unique' => false,
],
'ean' => [
'required' => false,
'unique' => false,
],
```
## Product Options
These are what you use to define the different options a product has available to it. These are directly related to the
different variants a product might have. Each `ProductOption` will have a set of `ProductOptionValue` models related to
it. For example:
You could have a `ProductOption` called "Colour" and then multiple `ProductionOptionValue` models for each colour you
would like to offer.
Product options and Product option values are defined at a system level and are translatable.
### Creating a `ProductOption`
```php theme={null}
$option = Lunar\Models\ProductOption::create([
'name' => [
'en' => 'Colour',
'fr' => 'Couleur',
],
'label' => [
'en' => 'Colour',
'fr' => 'Couleur',
],
]);
```
We can then create values for this option:
```php theme={null}
// Lunar\Models\ProductOptionValue
$option->values()->createMany([
[
'name' => [
'en' => 'Blue',
'fr' => 'Bleu',
],
],
[
'name' => [
'en' => 'Red',
'fr' => 'Rouge',
],
],
]);
```
This Product option and it's values are now ready to be used to with Product Variants.
# Product Shipping
By default Lunar will mark all product variants as `shippable`. If you don't need to ship a certain variant then you can
simply set this to false.
```php theme={null}
$variant->update([
'shippable' => false,
]);
```
## Product dimensions
Product's can have different dimensions assigned to them, the values we have available are
* Length
* Width
* Height
* Weight
* Volume
For handling conversions, we use the [Cartalyst Converter](https://github.com/cartalyst/converter/tree/master) package.
This supports a wide range of UOM and can convert those values to different measurements.
Each UOM has a corresponding `_value` and `_unit` column in the database. For example:
```php theme={null}
length_value
length_unit
width_value
width_unit
```
### Configuring measurements
You can configure the available UOM's in the `lunar/shipping.php` config file. Here is an example of what Lunar provides
by default:
**Length**
* m
* mm
* cm
* ft
* in
**Weight**
* kg
* g
* lbs
**Volume**
* l
* ml
* gal
* floz
### Getting and converting measurement values
You are free to access to the `*_value` and `*_unit` values for the variant and use them in their raw form, however we
do offer an accessor for each unit that you can use:
```php theme={null}
$variant->length->to('length.ft')->convert();
```
#### Volume calculation
Volume is calculated different to the rest of the measurements. You can either have it automatically figure out the
volume or manually set it yourself:
```php theme={null}
$variant->update([
'length_value' => 50,
'length_unit' => 'mm',
'height_value' => 50,
'height_unit' => 'mm',
'width_value' => 50,
'width_unit' => 'mm',
])
// By default will return ml
$variant->volume->getValue(); // 125
// Use any UOM you want for volume
$variant->volume->to('volume.l')->convert()->getValue(); // 12.5
// Set the volume manually and it'll always use that.
$variant->update([
'volume_unit' => 'floz',
'volume_value' => 100
]);
$variant->volume->getValue(); // 100
$variant->volume->to('volume.l')->convert()->getValue(); // 2.95735...
```
**Get a formatted value**
If you want to display a formatted value, you can!
```php theme={null}
$variant->length->format(); // 50cm
```
## Variants
Variants allow you to specify different variations of a product. Think things like Small Blue T-shirt, or Size 8 and
Size 9 Leather Boots. Your product is the main parent and your variants are based off that product to create multiple
permutations.
Variants are also responsible for storing data such as Pricing, Inventory/Stock information, Shipping information etc.
For that reason a product will always have at least one variant.
When you decide you want to offer more than one variant for a product, upon generation, Lunar will take the first
variant and use that as a base for all other variants in terms of pricing, inventory etc. So you won't lose any data you
may have already saved against the existing product.
## Creating variants
### New Product
If you have a new product, you would create your variants in bulk based on an array of `ProductOptionValue` IDs.
You will need to determine what variants you need to create and assign the correct option values to that variant.
For example, lets say we have an option "Colour" and we want to create "Blue" and "Red" variants.
A product variant will require a product, currency and a tax class.
If you do not have these entities created, you will need to do so before continuing.
If needed, Create the product and tax class.
```php theme={null}
$product = Product::create([...]);
$taxClass = TaxClass::create([...]);
$currency = Currency::create([...]);
```
Otherwise, fetch them.
```php theme={null}
$product = Product::where(...)->first();
$taxClass = TaxClass::where(...)->first();
$currency = Currency::where(...)->first();
```
You can also specify a status to limit results to using the provided scope.
```php theme={null}
Product::status('published')->get();
```
Then we need to create our base option and it's values.
```php theme={null}
$option = \Lunar\Models\ProductOption::create([
'name' => [
'en' => 'Colour',
];
'label' => [
'en' => 'Colour',
];
]);
$blueOption = $option->values()->create([
'name' => [
'en' => 'Blue',
],
]);
$redOption = $option->values()->create([
'name' => [
'en' => 'Red',
],
]);
```
From here we create our variant, associate it with a product and a tax class, then attach the option id.
```php theme={null}
$blueVariant = ProductVariant::create([
'sku' => 'blue-product',
]);
$blueVariant->values()->attach($blueOption);
$redVariant = ProductVariant::create([
'product_id' => $product->id,
'tax_class_id' => $taxClass->id,
'sku' => 'red-product',
]);
$redVariant->values()->attach($redOption);
```
Now, we need to create a price for our variant. This is where we use our *currency* created or fetched earlier.
```php theme={null}
$variant->prices()->create([
'price' => 199,
'currency_id' => $currency->id,
]);
```
### Exceptions
When creating variants there are some exceptions that will be thrown if certain conditions are met.
| Exception | Conditions |
| :------------------------------------------ | :----------------------------------------------------- |
| `Illuminate\Validation\ValidationException` | Thrown if validation fails on the value options array. |
## Pricing
### Overview
Prices are stored in the database as integers. When retrieving a `Price` model the `price` and `compare_price`
attributes are cast to a `Price` datatype. This casting gives you some useful helpers when dealing with prices on your
front end.
| Field | Description | Default | Required |
| :------------------ | :----------------------------------------------------------------------------------- | :------ | :------- |
| `price` | A integer value for the price | `null` | yes |
| `compare_price` | For display purposes, allows you to show a comparison price, e.g. RRP. | `null` | no |
| `currency_id` | The ID of the related currency | `null` | yes |
| `min_quantity` | The minimum quantity required to get this price. | `1` | no |
| `customer_group_id` | The customer group this price relates to, leaving as `null` means any customer group | `null` | no |
| `priceable_type` | This is the class reference to the related model which owns the price | `null` | yes |
| `priceable_id` | This is the id of the related model which owns the price | `null` | yes |
```php theme={null}
$priceable = \Lunar\Models\ProductVariant::create([/** ... */]);
$price = \Lunar\Models\Price::create([
'price' => 199,
'compare_price' => 299,
'currency_id' => 1,
'min_quantity' => 1,
'customer_group_id' => null,
'priceable_type' => $priceable->getMorphClass(),
'priceable_id' => $priceable->id,
]);
```
## Price formatting
For the full reference on how to format prices for your storefront see the [Pricing Reference](/0.x/reference/pricing)
The same methods apply to the compare\_price attribute
### Base Pricing
Pricing is defined on a variant level, meaning you will have a different price for each variant and also for each
currency in the system. In order to add pricing to a variant, you can either create the model directly or use the
relationship method.
```php theme={null}
$priceable = \Lunar\Models\ProductVariant::create([/** ... */]);
\Lunar\Models\Price::create([
'price' => 199,
'compare_price' => 299,
'currency_id' => 1,
'min_quantity' => 1,
'customer_group_id' => null,
'priceable_type' => $priceable->getMorphClass(),
'priceable_id' => $priceable->id,
]);
```
```php theme={null}
$variant->prices()->create([/* .. */]);
```
### Customer group pricing
You can specify which customer group the price applies to by setting the `customer_group_id` column. If left as `null`
the price will apply to all customer groups. This is useful if you want to have different pricing for certain customer
groups and also different price quantity breaks per customer group.
### Price Break Pricing
Price Break pricing is a concept in which when you buy in bulk, the cost per item will change (usually go down). With Pricing
on Lunar, this is determined by the `min_quantity` column when creating prices. For example:
```php theme={null}
Price::create([
// ...
'price' => 199,
'compare_price' => 399,
'min_quantity' => 1,
]);
Price::create([
// ...
'price' => 150,
'compare_price' => 399,
'min_quantity' => 10,
]);
```
In the above example if you order between 1 and 9 items you will pay `1.99` per item. But if you order at least 10 you
will pay `1.50` per item.
## Fetching the price
Once you've got your pricing all set up, you're likely going to want to display it on your storefront. We've created
a `PricingManager` which is available via a facade to make this process as painless as possible.
To get the pricing for a product you can simply use the following helpers:
#### Minimum example
A quantity of 1 is implied when not passed.
```php theme={null}
$pricing = \Lunar\Facades\Pricing::for($variant)->get();
```
#### With Quantities
```php theme={null}
$pricing = \Lunar\Facades\Pricing::qty(5)->for($variant)->get();
```
#### With Customer Groups
If you don't pass in a customer group, Lunar will use the default, including any pricing that isn't specific to a
customer group.
```php theme={null}
$pricing = \Lunar\Facades\Pricing::customerGroups($groups)->for($variant)->get();
// Or a single customer group
$pricing = \Lunar\Facades\Pricing::customerGroup($group)->for($variant)->get();
```
#### Specific to a user
The PricingManager assumes you want the price for the current authenticated user.
If you want to always return the guest price, you may use...
```php theme={null}
$pricing = \Lunar\Facades\Pricing::guest()->for($variant)->get();
```
Or to specify a different user...
```php theme={null}
$pricing = \Lunar\Facades\Pricing::user($user)->for($variant)->get();
```
#### With a specific currency
If you don't pass in a currency, the default is implied.
```php theme={null}
$pricing = \Lunar\Facades\Pricing::currency($currency)->for($variant)->get();
```
#### For a model
Assuming you have a model that implements the `hasPrices` trait, such as a `ProductVariant`, you can use the following
to retrieve pricing.
```php theme={null}
$pricing = $variant->pricing()->qty(5)->get();
```
If you try and fetch a price for a currency that doesn't exist, a ` Lunar\Exceptions\MissingCurrencyPriceException`
exception will be thrown.
***
This will return a `PricingResponse` object which you can interact with to display the correct prices. Unless it's a
collection, each property will return a `Lunar\Models\Price` object.
```php theme={null}
/**
* The price that was matched given the criteria.
*/
$pricing->matched;
/**
* The base price associated to the variant.
*/
$pricing->base;
/**
* A collection of all the price quantity breaks available for the given criteria.
*/
$pricing->priceBreaks;
/**
* All customer group pricing available for the given criteria.
*/
$pricing->customerGroupPrices;
```
Sometimes you might want to simply get all prices a product has from the variants, instead of loading up all a products
variants fetching the prices that way, you can use the `prices` relationship on the product.
```php theme={null}
$product->prices
```
This will return a collection of `Price` models.
### Storing Prices Inclusive of Tax
Lunar allows you to store pricing inclusive of tax if you need to. This is helpful if you need to show charm pricing, at
\$9.99 for example, which may not be possible if pricing is stored exclusive of tax due to rounding.
To start you will need to set the `stored_inclusive_of_tax` config value in `lunar/pricing` to `true`. Then you will
need to ensure your default Tax Zone is set up correctly with the correct tax rates.
Once set, the cart will automatically calculate the tax for you.
If you need to show both ex. and inc. tax pricing on your product pages, you can use the following methods which are
available on the `Lunar\Models\Price` model.
```php theme={null}
$price->priceIncTax();
$price->priceExTax();
$price->comparePriceIncTax(); // to retrieve the tax inclusive compare price
```
### Customising Prices with Pipelines
All pipelines are defined in `config/lunar/pricing.php`
```php theme={null}
'pipelines' => [
//,
],
```
You can add your own pipelines to the configuration, they might look something like:
```php theme={null}
pricing->matched;
$matchedPrice->price->value = 200;
$pricingManager->pricing->matched = $matchedPrice;
return $next($pricingManager);
}
}
```
```php theme={null}
'pipelines' => [
// ...
App\Pipelines\Pricing\CustomPricingPipeline::class,
],
```
Pipelines will run from top to bottom
## Full Example
For this example, we're going to be creating some Dr. Martens boots. Below is a screenshot of what we're aiming for:
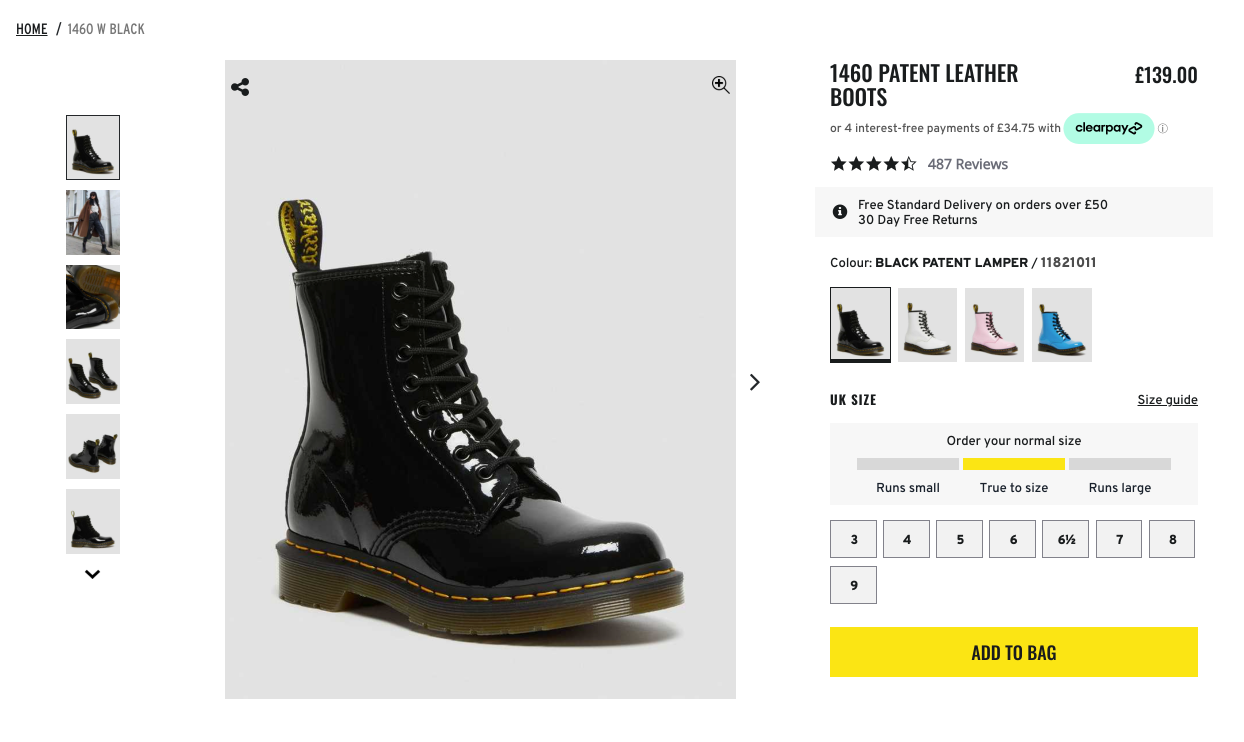 Here are the steps we're going to take:
* Create our product type
* Create the initial product
* Create the product options and their values
* Generate the variants based on those values
### Set up the product type.
```php theme={null}
$productType = Lunar\Models\ProductType::create([
'name' => 'Boots',
]);
```
This example assumes we already have Attributes set up for name and description and that they're assigned to the product
type.
### Create the initial product
```php theme={null}
Lunar\Models\Product::create([
'product_type_id' => $productType->id,
'status' => 'published',
'brand_id' => $brandId,
'sku' => 'DRBOOT',
'attribute_data' => [
'name' => new TranslatedText(collect([
'en' => new Text('1460 PATENT LEATHER BOOTS'),
])),
'description' => new Text('Even more shades from our archive...'),
],
]);
```
### Product Options
Based on the example above we're going to need 2 options, Size and Colour.
```php theme={null}
$colour = Lunar\Models\ProductOption::create([
'name' => [
'en' => 'Colour',
],
'label' => [
'en' => 'Colour',
],
]);
$size = Lunar\Models\ProductOption::create([
'name' => [
'en' => 'Size',
],
'label' => [
'en' => 'Size',
],
]);
```
### Product Option Values
From here we now need to create our option values like so:
```php theme={null}
$colour->values()->createMany([
[
'name' => [
'en' => 'Black',
],
],
[
'name' => [
'en' => 'White',
],
],
[
'name' => [
'en' => 'Pale Pink',
],
],
[
'name' => [
'en' => 'Mid Blue',
],
],
]);
// We won't do all the sizes here, just enough to get the idea...
$size->values()->createMany([
[
'name' => [
'en' => '3',
],
],
[
'name' => [
'en' => '6',
],
],
]);
```
### Generate the variants
First we just need to grab the values we want to use to generate the variants. Since we're generating them for
everything, we just grab all of them.
```php theme={null}
$optionValueIds = $size->values->merge($colour->values)->pluck('id');
\Lunar\Hub\Jobs\Products\GenerateVariants::dispatch($product, $optionValueIds);
```
When generating variants, the sku will be derived from the Product's base SKU, in this case `DRBOOT` and will be
suffixed with `-{count}`.
The resulting generation is as follows:
| SKU | Colour | Size |
| :------- | :-------- | :--- |
| DRBOOT-1 | Black | 3 |
| DRBOOT-2 | Black | 6 |
| DRBOOT-3 | White | 3 |
| DRBOOT-4 | White | 6 |
| DRBOOT-5 | Pale Pink | 3 |
| DRBOOT-6 | Pale Pink | 6 |
| DRBOOT-7 | Mid Blue | 3 |
| DRBOOT-8 | Mid Blue | 6 |
You are then free to change the SKU's as you see fit, update the pricing for each variant etc before publishing.
Here are the steps we're going to take:
* Create our product type
* Create the initial product
* Create the product options and their values
* Generate the variants based on those values
### Set up the product type.
```php theme={null}
$productType = Lunar\Models\ProductType::create([
'name' => 'Boots',
]);
```
This example assumes we already have Attributes set up for name and description and that they're assigned to the product
type.
### Create the initial product
```php theme={null}
Lunar\Models\Product::create([
'product_type_id' => $productType->id,
'status' => 'published',
'brand_id' => $brandId,
'sku' => 'DRBOOT',
'attribute_data' => [
'name' => new TranslatedText(collect([
'en' => new Text('1460 PATENT LEATHER BOOTS'),
])),
'description' => new Text('Even more shades from our archive...'),
],
]);
```
### Product Options
Based on the example above we're going to need 2 options, Size and Colour.
```php theme={null}
$colour = Lunar\Models\ProductOption::create([
'name' => [
'en' => 'Colour',
],
'label' => [
'en' => 'Colour',
],
]);
$size = Lunar\Models\ProductOption::create([
'name' => [
'en' => 'Size',
],
'label' => [
'en' => 'Size',
],
]);
```
### Product Option Values
From here we now need to create our option values like so:
```php theme={null}
$colour->values()->createMany([
[
'name' => [
'en' => 'Black',
],
],
[
'name' => [
'en' => 'White',
],
],
[
'name' => [
'en' => 'Pale Pink',
],
],
[
'name' => [
'en' => 'Mid Blue',
],
],
]);
// We won't do all the sizes here, just enough to get the idea...
$size->values()->createMany([
[
'name' => [
'en' => '3',
],
],
[
'name' => [
'en' => '6',
],
],
]);
```
### Generate the variants
First we just need to grab the values we want to use to generate the variants. Since we're generating them for
everything, we just grab all of them.
```php theme={null}
$optionValueIds = $size->values->merge($colour->values)->pluck('id');
\Lunar\Hub\Jobs\Products\GenerateVariants::dispatch($product, $optionValueIds);
```
When generating variants, the sku will be derived from the Product's base SKU, in this case `DRBOOT` and will be
suffixed with `-{count}`.
The resulting generation is as follows:
| SKU | Colour | Size |
| :------- | :-------- | :--- |
| DRBOOT-1 | Black | 3 |
| DRBOOT-2 | Black | 6 |
| DRBOOT-3 | White | 3 |
| DRBOOT-4 | White | 6 |
| DRBOOT-5 | Pale Pink | 3 |
| DRBOOT-6 | Pale Pink | 6 |
| DRBOOT-7 | Mid Blue | 3 |
| DRBOOT-8 | Mid Blue | 6 |
You are then free to change the SKU's as you see fit, update the pricing for each variant etc before publishing.